はじめに
お久しぶりです!miracleave新垣です!今年のゴールデンウィークも終わってしましたね!皆さんはどのように過ごしましたでしょうか?私は実家にかえってのんびり田舎ライフを満喫しました! 今回は私の次の案件がruby on railsを使ったプロジェクトということと、前からちゃんと勉強しようしようと放置していた Github Actionsの勉強がてらに rails (rspec) を使ってCIの構築をしてみようと思います! 先に環境構築を行ってGithub Actionsの解説を行います!
- 環境構築
まず、rails環境の準備を行いたいと思います。今回はdockerを使って環境構築を行いました。今回はGithub Actionsの解説をメインとします。dockerとrailsに関する細かい設定等の話は省略させて頂きます。作成したアプリケーションはgithub上にありますので確認してください。ここではディレクトリ構成、Dockerfile等のコードのみ紹介します。以下リンクを参考にいたしました。
https://qiita.com/shima-zu/items/b825c5a47b3582ef99cc
https://github.com/20yuteo/rails_cicd
- ディレクトリ構成
rails_app/
    ├ app/
    ├ bin/
    ├ config/
    ├ db/
    ├ lib/
    ├ log/
    ├ public/
    ├ spec/
    ├ storage/
    ├ tmp/
    ├ vendor/
    ├ Dockerfile
    ├ .env
    ├ Gemfile
    ├ Gemfile.lock
    ├.github/workflows/testing.yml
└ docker-compose.yml- Dockerfile
FROM ruby:2.7.2

ENV LANG C.UTF-8
ENV APP_ROOT /app

# install required libraries
RUN curl -sS https://dl.yarnpkg.com/debian/pubkey.gpg | apt-key add - && \
  echo "deb https://dl.yarnpkg.com/debian/ stable main" | tee /etc/apt/sources.list.d/yarn.list && \
  apt-get update -qq && \
  apt-get install -y --no-install-recommends \
  build-essential

RUN curl -sL https://deb.nodesource.com/setup_14.x | bash -

RUN apt-get install -y --no-install-recommends \
  nodejs \
  yarn && \
  apt-get clean && \
  rm --recursive --force /var/lib/apt/lists/*

# create working directory
RUN mkdir $APP_ROOT
WORKDIR $APP_ROOT

# bundle install
COPY Gemfile $APP_ROOT/Gemfile
COPY Gemfile.lock $APP_ROOT/Gemfile.lock
RUN bundle install --jobs 4 --retry 3

# create app in container
COPY . $APP_ROOT

# script to be executed every time the container starts
COPY entrypoint.sh /usr/bin/
RUN chmod +x /usr/bin/entrypoint.sh
ENTRYPOINT ["entrypoint.sh"]
EXPOSE 3000

# Start the main process
CMD ["rails", "server", "-b", "0.0.0.0"]- docker-compose.yml
version: '3.7'
services:
  db:
    image: mysql:8.0.20
    volumes:
      - mysql:/var/lib/mysql:delegated
    ports:
      - '3306:3306'
    command: --default-authentication-plugin=mysql_native_password
    env_file: .env

  web:
    build:
      context: .
      dockerfile: Dockerfile
    command: bash -c "rm -f tmp/pids/server.pid && bundle exec rails s -p 3000 -b '0.0.0.0'"
    tty: true
    stdin_open: true
    env_file: .env
    depends_on:
      - db
    ports:
      - '3000:3000'
    volumes:
      - .:/app:cached
      - bundle:/usr/local/bundle:delegated
      - node_modules:/app/node_modules
      - tmp-data:/app/tmp/sockets

volumes:
  mysql:
  bundle:
  node_modules:
tmp-data:- .env
MYSQL_ROOT_PASSWORD=password
TZ=Japan- Gemfile
source 'https://rubygems.org'
gem 'rails', '6.0.3'- entrypoint.sh
#!/bin/bash
set -e

# Remove a potentially pre-existing server.pid for Rails.
rm -f /myapp/tmp/pids/server.pid

# Then exec the container's main process (what's set as CMD in the Dockerfile).
exec "$@"
2. Github Actions の設定
以下のyamlファイルを確認してみましょう。Github Actionsの設定が記載されています。
- .github\workflows\testing.yml
name: testing

on:
 push:
 pull_request:

jobs:
  rspec:
    runs-on: ubuntu-latest
    timeout-minutes: 10
    services:
      mysql:
        image: mysql:8.0.20
        ports:
          - 3306:3306
        env:
          MYSQL_ALLOW_EMPTY_PASSWORD: yes
        options: --health-cmd "mysqladmin ping" --health-interval 10s --health-timeout 5s --health-retries 10

    steps:
      - name: Checkout code
        uses: actions/checkout@v2

      - name: Set up Ruby
        uses: ruby/setup-ruby@v1
        with:
          bundler-cache: true

      - name: Cache node modules
        uses: actions/cache@v2
        with:
          path: node_modules
          key: ${{ runner.os }}-node-${{ hashFiles('**/yarn.lock') }}
          restore-keys: |
            ${{ runner.os }}-node-

      - name: Bundler and gem install
        run: |
          gem install bundler
          bundle install --jobs 4 --retry 3 --path vendor/bundle

      - name: Yarn install
        run: yarn install --check-files

      - name: Database create and migrate
        run: |
          cp config/database.yml.ci config/database.yml
          bundle exec rails db:create RAILS_ENV=test
          bundle exec rails db:migrate RAILS_ENV=test

      - name: Run rspec
        run: bundle exec rspec
Github Actions のリファレンスを参照して testing.yml の内容を確認しましょう。
https://docs.github.com/ja/actions/using-workflows/workflow-syntax-for-github-actions
2-1. name
name: testingワークフローの名前。 GitHubでは、リポジトリのアクションページにワークフローの名前が表示されます。 nameを省略すると、GitHubはリポジトリのルートに対するワークフローファイルの相対パスをその値に設定します。
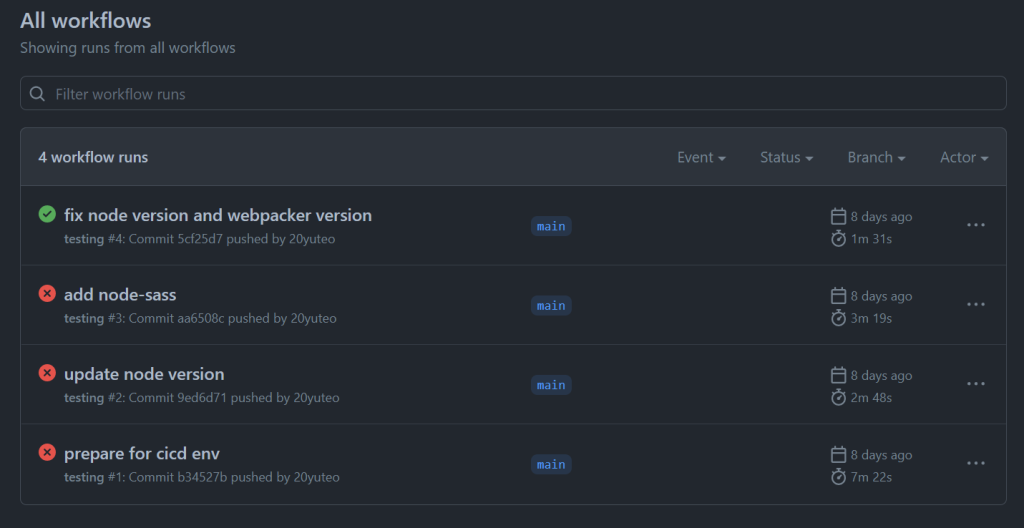
そのままですね。githubの Actions タブのAll workflowsに設定した名前で表示されます。

2-2. on
on:
 push:
 pull_request:
To automatically trigger a workflow, use on to define which events can cause the workflow to run. on に設定されたトリガーのタイミングで workflow が動作します。記載方法が多数あります。
今回は push と pull_request のタイミングで動作するように設定しています。詳細は公式ドキュメントを参照してください。
2-3. jobs
jobs:
  rspec:
A workflow run is made up of one or more jobs, which run in parallel by default.
workflow の実行を構成する1つ以上のステップのことです。今回は rspec という job のみですが複数設定可能です。
2-4. runs-on
runs-on: ubuntu-latest
timeout-minutes: 10
runs-on はgithubが提供しているホストランナーになります。今回は ubuntu を選択しています。 time-out-minutes は githubで自動的にキャンセルされるまでジョブを実行する最長時間になります。デフォルトで360分となっています。
2-5. services
    services:
      mysql:
        image: mysql:8.0.20
        ports:
          - 3306:3306
        env:
          MYSQL_ALLOW_EMPTY_PASSWORD: yes
        options: --health-cmd "mysqladmin ping" --health-interval 10s --health-timeout 5s --health-retries 10
ワークフロー中のジョブのためのサービスコンテナをホストするために使われます。 サービスコンテナは、データベースやRedisのようなキャッシュサービスの作成に役立ちます。 ランナーは自動的にDockerネットワークを作成し、サービスコンテナのライフサイクルを管理します。
今回はrailsアプリケーションに mysql を使用しているので上記のように設定しました。
2-6. steps
    steps:
      - name: Checkout code
        uses: actions/checkout@v3

      - name: Set up Ruby
        uses: ruby/setup-ruby@v1
        with:
          bundler-cache: true

      - name: Cache node modules
        uses: actions/cache@v2
        with:
          path: node_modules
          key: ${{ runner.os }}-node-${{ hashFiles('**/yarn.lock') }}
          restore-keys: |
            ${{ runner.os }}-node-

      - name: Bundler and gem install
        run: |
          gem install bundler
          bundle install --jobs 4 --retry 3 --path vendor/bundle

      - name: Yarn install
        run: yarn install --check-files

      - name: Database create and migrate
        run: |
          cp config/database.yml.ci config/database.yml
          bundle exec rails db:create RAILS_ENV=test
          bundle exec rails db:migrate RAILS_ENV=test

      - name: Run rspec
        run: bundle exec rspec
1つのジョブには、steps (ステップ) と呼ばれる一連のタスクがあります。 ステップでは、コマンドを実行する、設定タスクを実行する、あるいはリポジトリやパブリックリポジトリ、Dockerレジストリで公開されたアクションを実行することができます。 すべてのステップでアクションを実行するとは限りませんが、すべてのアクションはステップとして実行されます。
job に紐づくタスクのことを step と呼びます。ひとつづつ確認してみましょう。
2-7. actions/checkout@v3
  - name: Checkout code
    uses: actions/checkout@v3
name は step の名前になります。uses はジョブでステップの一部として実行されるアクションを選択します。 対象のソースを actions/checkout@v3 でチェックアウトします。
2-8. ruby/setup-ruby@v1
  - name: Set up Ruby
    uses: ruby/setup-ruby@v1
    with:
      bundler-cache: true
ruby/setup-ruby@v1 はビルド済みの ruby をダウンロードしてきます。細かい設定等は以下を参照してください。
2-9. actions/cache@v2
  - name: Cache node modules
    uses: actions/cache@v2
    with:
      path: node_modules
      key: ${{ runner.os }}-node-${{ hashFiles('**/yarn.lock') }}
      restore-keys: |
        ${{ runner.os }}-node-
actions/cache@v2 依存関係をキャッシングして workflow のスピードを上げるものです。 今回は node_modulues をキャッシュするために使用しました。
https://docs.github.com/ja/actions/using-workflows/caching-dependencies-to-speed-up-workflows
2-10. Bundler and gem install
  - name: Bundler and gem install
    run: |
      gem install bundler
      bundle install --jobs 4 --retry 3 --path vendor/bundle
上記の処理は記載している通りでbundlerをインストールしてrailsアプリケーションに必要な gem を bundle install で取得しています。
2-11. Yarn install
  - name: Yarn install
    run: yarn install --check-files
こちらも記述通りで yarn install によって必要なパッケージをインストールしています。
2-12. Database create and migrate
  - name: Database create and migrate
    run: |
      cp config/database.yml.ci config/database.yml
      bundle exec rails db:create RAILS_ENV=test
      bundle exec rails db:migrate RAILS_ENV=test
rails に必要な gem が install 出来たので database を作成し migration を実行します。その際に必要なファイルは以下に用意しています。
- config/database.yml.ci
  - name: Run rspec
    run: bundle exec rspec
実行環境が整いました。いよいよテスト実行です。実際に実行すると以下のように actions で実行状況等が確認できるはずです。

3. まとめ
公式リファレンスなどを参照するとどのようなことが設定されているのが分かりやすくまとめられており導入しやすさを感じました! 実際の現場で採用する際にはもう少し細かい設定も必要になるかと思いますので今回の内容で取り上げたリンクなどを参考にしてみてください!


